
Living Room Lighting Layout Made Simple

A living room can have an attractive chandelier, recessed ceiling lights, and a pair of lamps, yet still feel gloomy beside the sofa and painfully bright in front of the television. That mismatch usually starts before anyone chooses a fixture. The furniture, windows, sightlines, and daily activities determine whether a living room lighting layout feels calm and useful or patchy and overlit.
The practical fix is to plan from the room outward. Once seating, circulation, reading areas, the TV, and focal walls are marked, each light has a job. That furniture-first approach produces a more comfortable room than buying attractive fixtures from a catalog and trying to force them into place afterward.
Planning Light Around How You Actually Live in the Room
A typical Hampton Roads living room has to handle more than one routine. The sofa hosts conversation, one chair becomes a reading spot, the television needs a controlled background, and the path between the entry and the kitchen must stay clear. A good plan starts by measuring the room, recording the ceiling height, and marking windows, doors, outlets, and switch locations before shopping for fixtures.
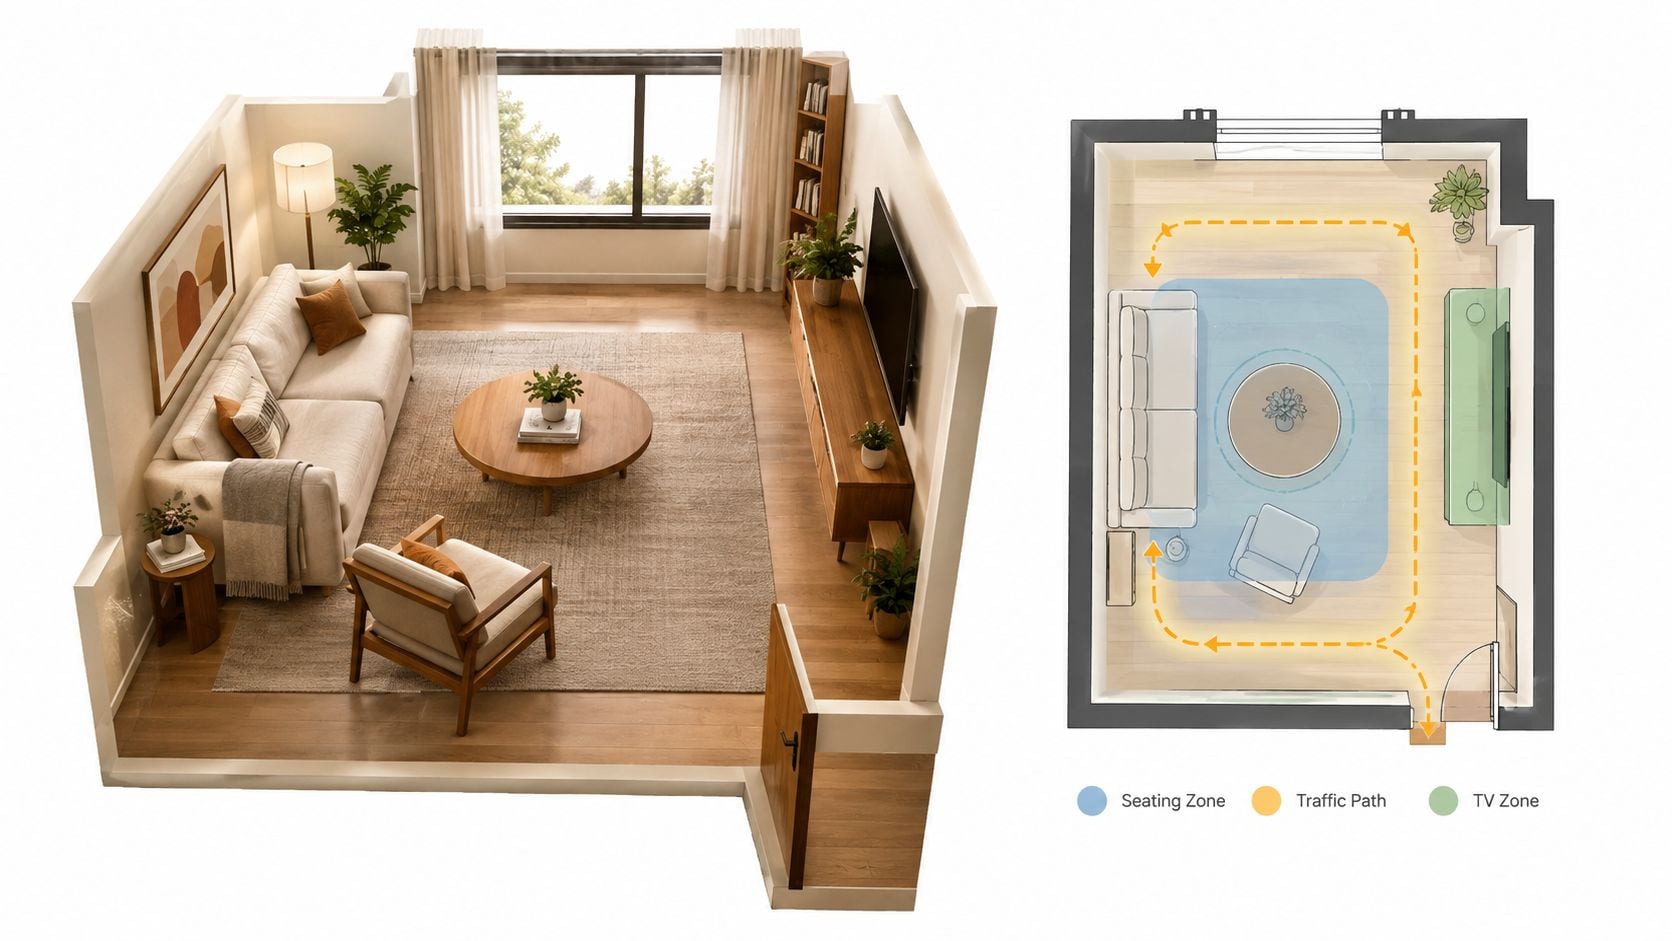
Draw the furniture footprint on paper or a floor-plan app. Mark the traffic paths first, then identify the seating zones, media wall, fireplace or artwork, and any corner used for reading, homework, or quiet conversation. Independent space-planning techniques help reveal a problem that fixture catalogs hide: a ceiling light can be centered perfectly in the room while missing the chairs entirely.
Start with zones, not fixtures
For a 14 by 18 foot room containing a sofa, two chairs, and a media wall, the sketch should show at least three functional areas:
- Sofa and conversation zone: A comfortable ambient source supports movement and socializing without shining directly into seated eyes.
- Reading chair: A dedicated floor lamp, table lamp, or wall-mounted task source follows the chair rather than the geometric center of the room.
- Media wall: Controlled background or accent light adds depth without placing a bright source between the viewer and the screen.
The seating plan also determines whether a lamp needs to sit beside an end table, arc over a shoulder, or stand behind the sofa. Vertical surfaces deserve attention because wall washing makes a room feel more expansive than a ceiling-only scheme that lights the floor and leaves the perimeter dark. Guidance on layered living-room lighting supports combining ambient, task, and accent sources at different heights, including at least one indirect or semi-indirect dimmable source.
Why the catalog-first approach fails
Catalog-first shopping encourages a large central fixture to do every job. That approach often leaves the reading chair dim, produces glare on the television, and over-lights empty circulation space. A furniture-first plan may call for several modest sources instead, each controlled for a specific activity.
The floor plan also exposes conflicts early. A tall lamp may block a window, a picture light may compete with a wall-mounted screen, or a recessed light may land behind a tall cabinet. Solving those issues on paper costs less effort than relocating wiring or returning fixtures after installation.
The Three Lighting Layers and What Each One Does
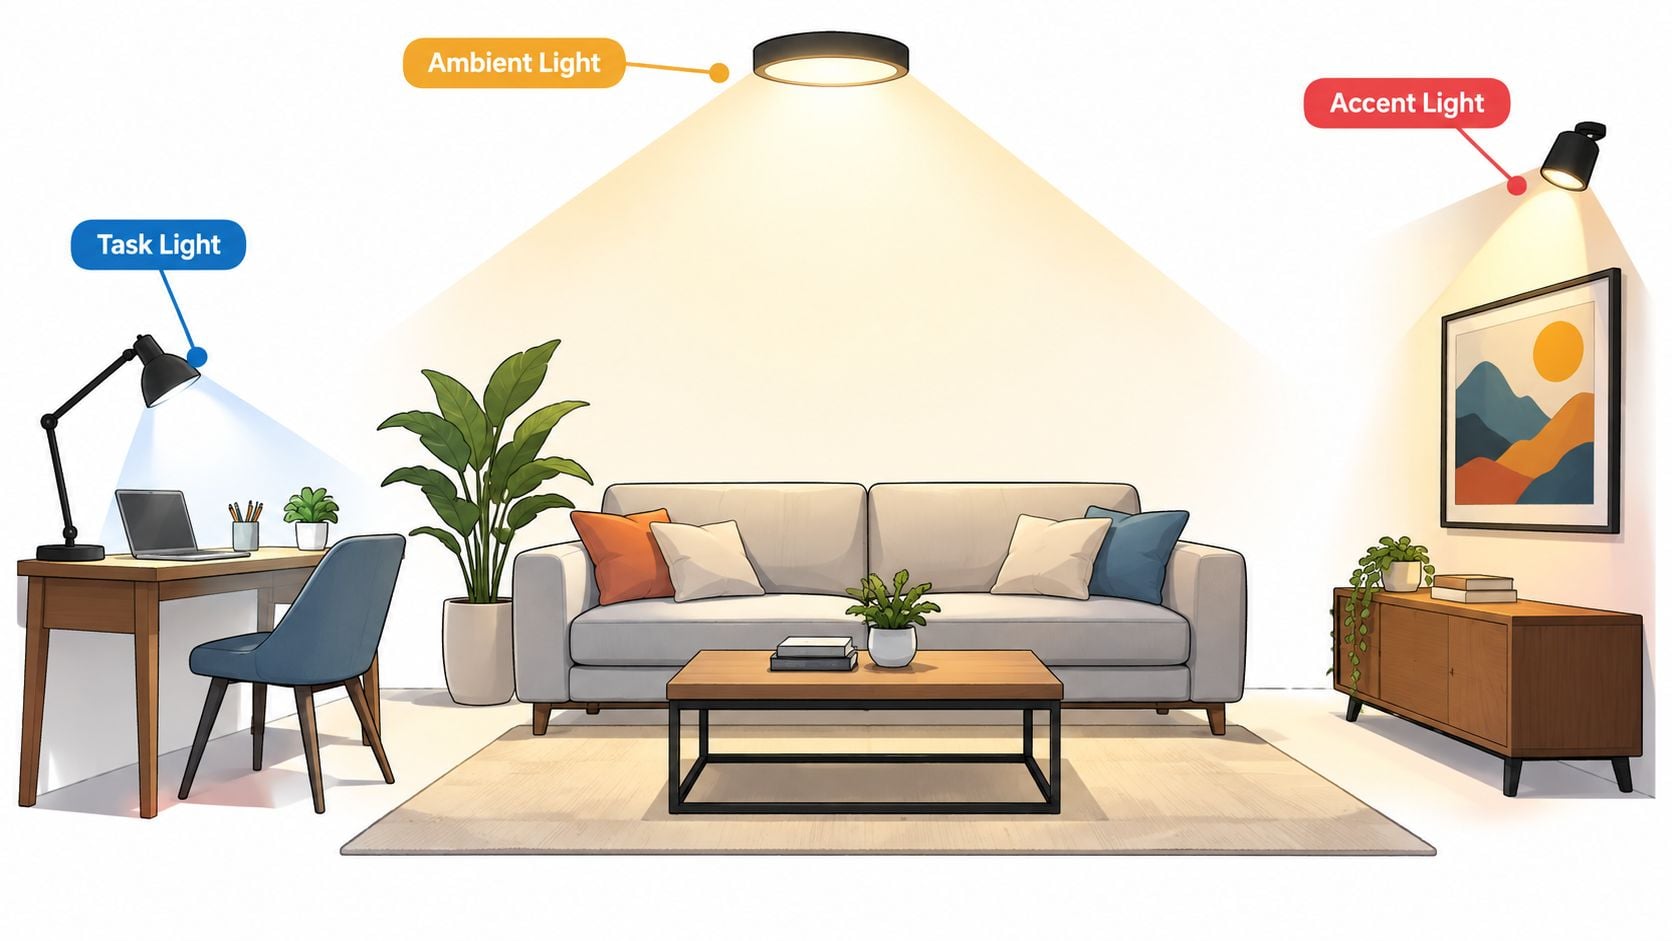
A living room works best when each light answers a recognizable need. Ambient lighting provides the general wash that makes movement comfortable. Task lighting concentrates illumination where someone reads, works a puzzle, plays a game, or handles a small activity. Accent lighting directs attention toward art, a fireplace, shelving, textured walls, or another architectural feature.
Ambient sources commonly include dimmable recessed downlights, a ceiling fixture, an indirect torchiere, a cove, or a wall sconce. Task sources include table lamps and floor lamps placed close to seating. Accent sources include picture lights, adjustable spotlights, and fixtures that graze a wall rather than point straight at the floor.
Match the layer to the activity
Ambient light should be broad and adjustable. It supports circulation and general conversation, but it shouldn't be the only source because overhead brightness can flatten the room and create uncomfortable shadows. Task light belongs near the person doing the activity, with the shade or beam positioned to avoid glare on a page or screen.
Accent light adds hierarchy. A picture light can pull attention toward artwork, while a low lamp on a console can give the far side of a room a reason to remain visually active. A room with large windows can also benefit from carefully coordinated window proportions and custom steel window options, since daylight openings influence where evening accent and ambient sources need to compensate.
A useful furniture detail is the end table. Properly scaled tables give lamps a stable home and keep cords away from walking paths, which is why side-table styling guidance can support the lighting plan rather than treating the lamp as an afterthought.
Estimate the source count
The exact count depends on ceiling height, furniture density, wall color, window area, and fixture output. As a practical planning range, expert guidance commonly places a standard room around three to five light sources, while an average-sized living room may use five to 10 lighting points in a layered arrangement, as described in this living-room lighting guide.
A 12 by 14 foot room may realistically need roughly five to seven sources, distributed across ambient, task, and accent duties. A 20 by 24 foot great room may need approximately 10 to 14 sources, particularly when it includes several seating groups, a dining edge, or a fireplace wall. More sources at lower output usually feel calmer than fewer fixtures driven at high output.
Sizing Brightness by Room and by Activity
Fixture labels become easier to compare once brightness is separated by purpose. A practical ambient baseline is 10 to 20 lumens per square foot, which corresponds to about 100 to 200 lux in the cited guidance for general living-room illumination (ambient-lighting guidance). The upper end suits cleaning, circulation, and hosting, while the lower end supports relaxed evening use when dimming is available.
Task areas need more concentrated output than the rest of the room. For planning purposes, a reading or close-work zone can be treated as roughly 50 to 75 lumens per square foot, while accent areas can sit around 5 to 10 lumens per square foot when the objective is visual emphasis rather than general illumination. These figures should guide the distribution of light, not encourage a single powerful fixture pointed at one chair.
Consider a room with a general area that calls for an ambient target of 20 lumens per square foot, a defined reading zone planned at 50 to 75 lumens per square foot, and a small artwork area planned at 5 to 10 lumens per square foot. The useful calculation is to multiply each zone's area by its target, add the results, and divide the output across several dimmable sources. A living-room rug size guide can help confirm the furniture footprint before those zones are measured.
Lumen Targets by Layer and Bulb Equivalents
| Layer | Lumens per Sq Ft | Incandescent Equivalent | LED Equivalent | Color Temperature |
|---|---|---|---|---|
| Ambient | 10 to 20 | Traditional general-purpose output | Efficient general-purpose output | 2700K to 3000K |
| Task | 50 to 75 | Brighter focused output | High-output focused output | 2700K to 3000K |
| Accent | 5 to 10 | Low-output decorative output | Low-output directional output | 2700K to 3000K |
Living rooms generally feel most comfortable in the 2700K to 3000K range. Warm-dim LEDs can become warmer as they dim, which suits movie watching and conversation, while fixed-color LEDs keep a steadier appearance. Color accuracy matters near artwork, upholstery, and wood finishes, so output and color quality should be judged together rather than by lumens alone.
Fixture Placement and Spacing That Actually Works
Recessed downlights are among the most misused fixtures in living rooms. They shouldn't be arranged as an automatic grid across the ceiling. The furniture footprint matters more than the room's geometric center, and a row placed directly over the sofa can create glare while leaving the chairs and wall perimeter underlit.
A practical recessed-light rule places fixtures about 1.2 to 1.5 meters from each wall and keeps a similar distance between fixtures, which helps reduce dark spots and distribute illumination (recessed-light spacing guidance). In a seating area, the pattern should be staggered over the useful footprint rather than run in rigid lines parallel to the sofa. Ceiling height, trim size, beam spread, and dimming behavior still need to be checked together.

Keep light close to the person using it
A 6-inch recessed can on an 8-foot ceiling can throw a tight cone. Two fixtures aimed at one chair may read as one bright spot instead of comfortable, even coverage, especially when the chair has a tall back or the light source sits too close to the occupant's sightline.
Table lamps need equal attention. The lamp should sit approximately 26 to 30 inches above the seat cushion, with the bottom of the shade near eye level when seated. That position keeps the bulb out of direct view and places useful light on a book, side table, or conversation area. A floor lamp should arc over the shoulder or stand slightly behind the seating position, not sit beside the ear where the shade and bulb enter the peripheral view.
Sofa scale affects every one of these decisions. Before choosing an end-table lamp or placing a floor fixture, homeowners can use this guide on how to choose the right sofa for a space to confirm that the seating footprint leaves enough room for the light source.
Protect the television sightline
The biggest TV mistake is placing a lamp between the screen and the viewer. The reflection lands directly on the panel, so the lamp remains distracting even when its output is modest. Move that source beside or behind the seating, use a dimmable wall wash behind the screen, or place a low accent source on an adjacent console.
Wall sconces generally look more comfortable when mounted around 60 to 66 inches above the floor, adjusted for ceiling height and furniture scale. For artwork, a picture light or adjustable accent source should aim at roughly 30 degrees to reduce reflected glare and spread light across the surface rather than creating a bright hotspot.
Switches, Dimmers, and Circuits for Real Flexibility
A layered living room can still fail if every fixture operates from one switch. The control plan often does more for comfort than replacing one fixture with another because separate circuits let the room change for a film, a gathering, or reading without moving furniture or unplugging lamps.
A useful arrangement includes a master control at the entry, with independent control for ambient, task, and accent lighting. A switched outlet for a floor lamp adds flexibility when the lamp sits away from hardwired fixtures. Table lamps may remain locally controlled, but the most frequently used combinations should be easy to reach from the entry and from the primary seating position.
Practical rule: The dimmer belongs on the layer that creates the problem, not automatically on the ceiling lights.
Many homeowners dim the overhead cans while leaving table lamps blazing. That preserves the very contrast that makes the room feel harsh. A better scene reduces the ambient layer, softens the task sources, and keeps selected accent lights active so the walls and furnishings don't disappear.
Match the dimmer to the driver
LED dimming isn't universal. The bulb, fixture driver, transformer, and dimmer must be compatible, or the result may include flicker, buzzing, a narrow usable range, or lights that refuse to turn off completely. Fixtures such as sconces and tape systems may use different control methods, including ELV and 0-10V dimming, so the electrical specification should be checked before installation.
A clear explanation of installation considerations appears in this DLG Electrical dimmer guide. For finished rooms or rental properties, smart switches and scene controls can provide a shortcut to layered flexibility, but they still need bulbs and drivers that match the control system. Wireless control can't correct an incompatible electrical pairing.
Setting the Mood for Movie Night, Hosting, and Reading
The furniture doesn't need to change when the room changes function. The lighting scene does. A well-planned living room lighting layout lets one space move from screen viewing to conversation and then to reading by adjusting the intensity and balance of the same layers.
For movie night, recessed cans can drop to 10 percent, or the ambient layer can be turned off if the screen remains comfortable. A 2700K floor lamp behind the sofa at a low setting keeps a small amount of orientation light away from the screen and helps the room avoid an abrupt transition from a bright room to a dark one. Screen placement and viewing angles deserve equal attention, so this home cinema setup advice provides useful context for coordinating the TV wall with the lighting plan.
Hosting calls for a broader, more even mix. Ambient light can rise to approximately 70 percent, a buffet or console accent can operate at full output, and table lamps can sit at a warm mid-level so faces remain readable across the seating area. The goal isn't maximum brightness. It's balanced illumination that keeps the room welcoming without making the ceiling the visual focus.
Reading needs a different hierarchy. The floor lamp becomes the hero at full output with a 2700K or 3000K bulb, a small sconce or picture light can fill the background at 30 percent, and overhead ambient light can drop to about 20 percent to reduce glare on the page. The best TV positioning guidance should be considered alongside the chair and lamp locations, since a screen and a reading task often compete for the same wall or seating zone.
Layer Intensity by Scene
| Layer | Movie Night | Hosting | Reading Hour |
|---|---|---|---|
| Ambient | 0 to 10 percent | About 70 percent | About 20 percent |
| Task | Low or off | Warm mid-level | Full output at the reading seat |
| Accent | Low background glow | Full at console or focal wall | About 30 percent |
The apparent color also shifts with intensity. The same warm bulbs can feel warmer at a lower setting and more neutral when raised, which is a useful design tool rather than a defect. Scenes should be judged from the seated eye level, with the television on when screen glare is part of the room's normal use.
Your Living Room Lighting Checklist and Next Steps
Before visiting a showroom or ordering fixtures, the homeowner should bring a simple plan rather than relying on memory. The checklist below catches most placement problems before they become installation problems.
- Record the room: Measure length, width, ceiling height, windows, doors, and major architectural features.
- Mark the furniture: Draw the sofa, chairs, tables, media console, fireplace, and circulation paths at their intended scale.
- Assign each layer: Note the ambient, task, and accent source serving every active zone.
- Count the sources: Record how many fixtures or controllable points belong to each layer.
- Check electrical access: Mark existing outlets, switch locations, switched outlets, and any proposed hardwired points.
- Protect sightlines: Check the television reflection path, seated eye levels, artwork angles, and window views.
- Confirm controls: List which sources need dimming, which need separate circuits, and which may use smart control.
The final selection involves trade-offs. Warm-dim LEDs create a relaxed evening effect, while steady-color LEDs can make colors easier to compare during shopping. Color-accuracy ratings matter near art, upholstery, and natural wood. Fixture finishes should coordinate across sconces, lamps, hardware, and ceiling fixtures without forcing every piece to match perfectly.

The Willis Design Center can customize layered lighting ideas around a room's measurements, seating plan, finish palette, and daily routines. Homeowners considering premium furniture can ask about available financing options, while budget-conscious shoppers can visit the Willis Outlet for discounted quality pieces and floor samples. The result should be a coordinated room plan, not a collection of attractive fixtures that compete for attention.
Bring the floor plan, furniture measurements, outlet locations, and a rough sketch to the Willis Design Center before making final selections. The consultants can help match fixtures to the room, confirm dimmer compatibility, and coordinate lighting finishes with rugs, upholstery, and casegoods in one visit.
Willis Furniture & Mattress offers room planning, custom upholstery, coordinated rugs and accessories, and lighting guidance through its Design Center. Visit Willis Furniture & Mattress with the living room sketch and furniture measurements so the lighting layout can be matched to the way the room is used.